Wednesday 21 July 2010

Look what my kids made!

These are the end of year present for my kids teachers. I tried to persuade them to make a covered spoon or a pen as I thought these would be more useful presents but they were both quite determined to give jewellery (guess it is often what I give these days). Daisy in particular really loved my necklace below and wanted to make one just like it for her teachers.
The inspiration made by me
I obviously showed them what to do but the following necklaces were made entirely by my children! They chose the colours and the way the beads were put together.


IMG_2914
James aged nearly 6 made these for his teacher and his Beavers leader

Daisy at work

IMG_2911
Daisy aged 4 and a half made these for her 2 nursery teachers

Daisy made the blue one first about a week ago and then made the other today - she even remembered how to make Natalia's 'Spongia' beads (they are the central ruffled looking ones)

Can't wait to see what they are creating in a few years time!

And the winner is....

Congratulations to Gayle who was the lucky winner of the CSN stores voucher. Hopefully she has already received her voucher code so she can get shopping in any of the CSN stores. Do let us know what you buy!!

My daughter really loved picking out a scrunched up piece of paper from a bowl and she spent some time picking them up and opening them all and did it again! Unfortunately there could only be one winner.

Life has been hectic recently and haven't had much time for clay :( I hope to get a chance to do some tomorrow as it may be my last uninterrupted time for the summer holidays.

Sunday 11 July 2010

Giveaway thanks to CSN

I am pleased to announce that I have a £25 gift voucher to give-away to one lucky reader thanks to CSN Stores. CSN Stores has  amazing online stores where you can find everything from cookware to ceiling lights to furniture!


They sell an amazing selection of goods, here are some of my favourite items


Beautiful bone china mugs 
Fab cup cake stands!

Italian designed Chandeliers


To enter all you need to do is leave a comment below. You can have an extra entry if you become a follower or if you blog, tweet or facebook a link to this give away - please leave a comment to let me know you have done this. I will place every entry into a hat  and my 4 year old daughter will pick the winner on Tuesday 20th July at 6pm GM time. 


The giveaway is open to entrants from the UK, US, Canada and Germany. I am afraid people in other countries won't be eligible due to shipping restrictions. My daughter will pick the winner and the prize will vary slightly depending on where they live.


For a UK winner they will be sent a one-time-use £25 gift voucher  to use as they wish on any of CSN Stores UK websites listed below


If the  winner is from the US or Canada, they will receive a one-time-use  $25gift voucher will is valid on one of the 200+  CSN US websites which can be found through their main site http://www.csnstores.com). 


A winner from Germany, will recieve a one-time-use  €25gift voucher will is valid on CSN's  German websites which are http://www.kuecheundhaushalt.de/
http://www.leuchtenbycsn.de/
 http://www.moebelbycsn.de/
http://www.csnstores.de/

Good luck!!!


(updated to included details for international readers)

Saturday 10 July 2010

Really Round Natasha Beads


I made another tube Natasha bead but then decided to make some balls so I cut it in half and reshaped them. I think the tube bead works better cause you appreciate the 'mirror' better but it is always good to try something new. Hope you are all having a fab weekend. I had a wonderful afternoon with the girls enjoying cream tea in the sunshine and then a night of cocktails - fun, fun, fun!

Friday 9 July 2010

Dora's anemone cane

I had a few minutes today and wanted to try something new. I went to Google Reader which I now use to follow all those lovely blogs people write and found some of my items tagged  'want to try'. I decided to have a go at this anemone cane from Dora's Explorations blog as it looked like I would get it done in the time I had (lovely husband has gone to pick up the kids from school for me).

I went with rainbow as I wanted to try out the method of doing a rainbow skinner blend we did with Lindly Haunani at Polymer Play Days. Using her advice I cut of a bit I didn't like and this is the cane I ended up with

Made a bracelet with the pearl spliced flower beads


Finished bracelet
Originally uploaded by surfingcat clay
So they have been growing on me and now I love this little bracelet! I hope my friend does too.

I started making spliced flower canes when I watched Cindy Leitz's tutorial

New twist on the Bam Bam

For my latest Bam Bam bracelet I tried putting twists of extruded clay around the end of one of the parts to disguise the join. This would have worked well if I hadn't of snapped one of the pieces whilst sanding a bit too roughly! I repaired it with Kato Paste but I can't get the elastic through so I guess some paste must of got in hole. I may try poking some wire down to see if I can clear it. This is what it would look like if I could assemble it. (you may notice that it isn't quite round - did a bad job sanding the ends - oh well more practise needed)

Zebra spoon


Zebra spoon
Originally uploaded by surfingcat clay
Another birthday present this time a funky zebra print tea spoon.

Thursday 8 July 2010

More Bam Bam bracelets


IMG_2844
Originally uploaded by surfingcat clay

I made this bam bam bangle (follow the link for details of the tutorial and my first attempt at a bam bam bracelet) a little larger than the others and therefore it slips over my wrist without needing to be in 2 parts. I covered the join with a little extruded string. I made another curved tube bead and have strung it on a simple cord. After sanding I buffed them with my home made muslin buffing wheel on the Dremel -they are beautifully shiny now!

Wednesday 7 July 2010

Spliced Flower Cane with pearl and round Natasha bead

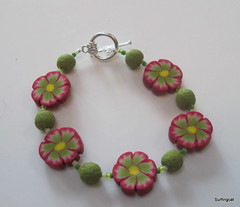
I am going out for afternoon tea to a posh hotel in Bath on Saturday for one of my friends birthdays so I thought I would make her some jewellery as a gift (I don't think I have told her about this blog yet so it should remain a surprise!). I haven't made a spliced flower cane for a week or so now so thought I would make some spliced flower beads, funny how I didn't think I liked them till I made one and now I love them.

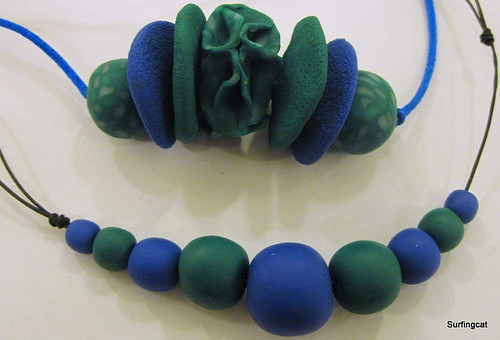
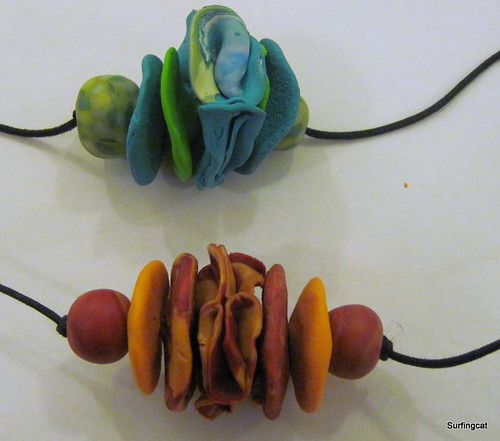
I always seem to make small spliced flower canes and then wish I had made them bigger so this time I started bigger.  I decided to use my favourite green and my new favourite red (it's a 1:3 red:magenta mix with Kato clay) as they seemed like good colours for my friend. Funny how you see people all the time but it can be hard to remember what colours they wear. I was a bit concerned they might seem a little 'Christmas' or 'apple' like together but after putting scraps together thought it would be OK.

I decided I would try  using pearl instead of white thinking it would give the beads a bit of a shimmer.This was a mistake however. There is less definition in the flower. Typical that I make a big one I don't like so much.

 Oh well it is still pretty and I think the colours work quite well and aren't too 'Christmas' or 'apple' (let me know if I am deluded ). Going to have to make another cane with these colours and white now I think but must get some beads made from this one first.

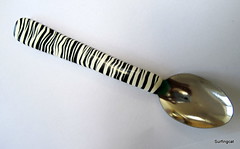
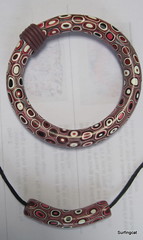
I picked up the scraps from the cane and made a Natasha bead (see a lesson from PCC if you aren't familiar with Natasha beads - a neat way to use up scraps) . I always have trouble with the joins with these as I don't want to smooth too much as I want to keep the pattern crisp where the joins are in the centre of the bead and unless you cut very accurately there can be some uneven parts (you can control it for the first 3 parts but the last one has to match the other 2 pieces already there). Tonight I just rolled it and made it round. There was something about the colours and the patterns that was too organic for a square shaped bead. I put a skewer in the middle whilst rolling it to keep a hole  and when I took it off the skewer it told me it wanted to be curved - so it is. More and more the clay is talking to me, I shall take that as a good sign of creativity and not a sign of madness (or more likely sleep deprivation from staying up late playing with clay!)

Sunday 4 July 2010

Sutton slice technique

Whilst at Polymer Play Days I saw some stunning jewellery both for sale and being worn by the other participants. I shall perhaps try to feature some in the coming days. One of the pieces I admired had been made by Irene Hoiles using the Sutton Slice technique. She was kind enough to describe the process to us. I couldn't wait to try it out so had a go in my hotel room (luckily I was given some stamps in the goody bags we were given when we registered).

I used a tiny flower from a larger stamp, pressing white clay into the stamp and then shaving off the excess clay

Here is is after pressing a piece of blue clay on top

I used my lovely new cutters that I bought from Valerie (no they aren't rusty it's funny lighting I think)

Little finished piece
It's not perfect by any means but I had got the basics of the technique. Tonight I decided to practise it. Hmm I think it was beginners luck before and I had many attempts to get anything that wasn't screwed up for scrap. The problem seems to be to get the clay to 'stick' in the stamp whilst you are shaving of the excess and then getting it out. I can do one no problem, but not both. If I spray the stamp with a mist of water the clay will lift out easily - too easily so it just lifts out when I try to shave it. If I don't it will stick in well to shave it but not come out completely. I guess perhaps my shaving technique needs improving. As always tips most gratefully received!

Here are my efforts tonight. I do think getting the right stamp is important too. I don't have many deep stamps so will have to keep a look out for some better ones for clay work. These were 2 of the several I tried which worked best.
Clay in stamp

Clay on black backing
 
Using a different stamp

Friday 2 July 2010

Blog Candy on Hickydorums

Besides learning lots from all the wonderful tutors at polymer play days I also met lots of great people. I am working my way through all their cards that came with beads from the swap or from their shop displays to check out their blogs/webpages etc.

Tonight I came across Neet's blog and she has some great pictures from the Polymer Play Days weekend on her blog and also a blog candy giveaway - go check out her blog to see the photos and enter the draw for the blog candy.

Polymer Play Days - Nottingham - June 2010 - using the techniques at home

Here are some things I have made at home this week after learning some techniques from Donna Kato and Lindly Haunani at Polymer Play Days.

I had another go at a spinner ring and was a bit heavy handed and broke the shank - luckily Donna had taught us a lot about mending so I fixed it! It isn't perfect but I know what I need to do to make the next one better. This one is a more practical size than my first and I think if I could make it stick out a bit less (I have a idea how to do that) I would actually wear it. I am getting bold in my jewellery these days!

Side view of spinner ring

front view of spinner ring
 I finished off my bubbles sheets that I started in Lindly's class and made some things from it. A coaster - a trial for a coaster swap I am taking part in on PCC and a Bam bam bracelet. I will definitely put beads between the 2 parts of my next bam bam bracelet (I think I said that last time too - I need someone to remind me - Toni where are you when I need you?)
bubbles coaster

bubbles bam bam bracelet
I have a million ideas in my head of things I would like to make and things I want to try with polymer clay - I just need more hours in the day!

Hope you all have a fantastic weekend