Showing posts with label London polymer clay group. Show all posts

Tuesday, 31 July 2012

Faux Lapis Lazuli demonstration

On Sunday I went to the wonderful London Polymer Clay Group and demonstrated a way to make faux Lapis Lazuli from polymer clay. The focus of the meeting was faux techniques in the colours of the Olympic rings. As well as my demonstration there were brilliant demonstrations on faux malachite from Sue Margetts and faux bone/ivory from Debbie Carlton. There were handouts available for some other techniques.

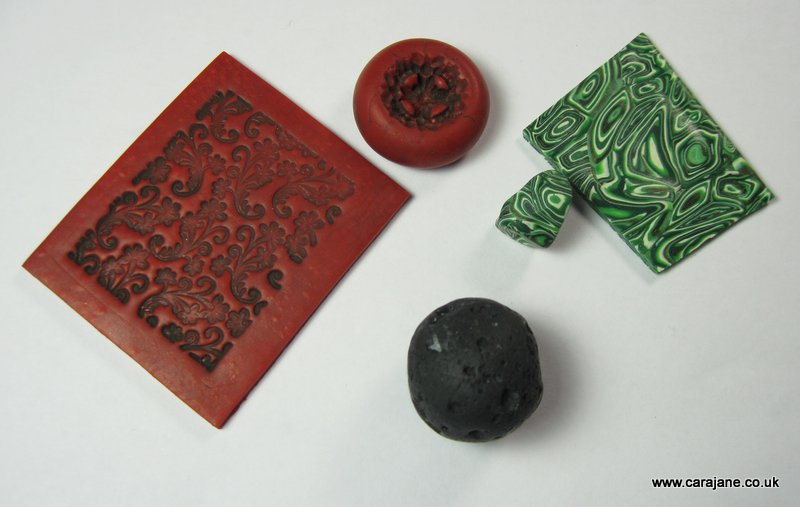
Here's what I had a go at from the demos/handouts
Faux cinnabar , faux malachite and faux Lava rock

I spent a lot of time playing about with several different Lapis Lazuli techniques and colour recipes before I share my demo with the group. I will try and write some of it up properly to share you with soon, including some colour recipes for Kato clay. My favourite technique was the one in Carol Blackburn's excellent book  In the meantime here's some pictures

The beads are real Lapis, the cabochons in the middle were made with different recipes

Precious little creatures.

Some of the owls have had some Pearlex powder applied to the markings - you should be able to spot the 2 who have. There is also a cute little faux Lapis cat!

Thursday, 5 January 2012

London Polymer Clay Group Demonstration

I will be giving a demonstration at the next London Polymer Clay Group meeting which is on Sunday 29th January on how I make this background less star flower cane and then form them into cupped flower beads. I must credit Zuleykha for showing me how to make the flower beads but the cane is my own, from a fabric pattern (to match a top, which I might even wear to the meeting if I remember) and I will demonstrate how I make a small flower cane with no background, without playdough!

Here are some of my creations using this technique, my own favourite bracelet that matches the top with these flowers as part of the print.

You may remember these blue and brown ones as being my sisters wedding jewellery if you have been following this blog since the summer.


I am also running a trial with some friends to see how long it takes to make these in a workshop so I can offer it as a workshop locally (Bristol UK) later in the year.

Only 7 more followers til I hit 100 and share that cat tutorial! Thank you!

Tuesday, 13 September 2011

Diary, Demonstration and workshops

Please note the new diary link above, that should show you an online calendar with my sale, demonstration and workshop dates. Some dates you might want to know about if you live near Bristol (UK)...

I will be demonstrating making polymer clay jewellery in Hobby Crafts at Cribbs Causeway, Bristol  this Thursday 15th September between 10am and 4pm. Come along, say hello and watch me work if you are anywhere near!

I have also organised some more dates for polymer clay workshops in Bristol (UK). Both workshops are suitable for complete beginners or people fairly new to polymer clay work. Please contact me for more details or to book a place.


Rainbow jellyroll jewellery

 You will make a rainbow jellyroll cane and use slices of it to make a pendant, earrings or beads.

 Tuesday 4th October 7.30-10.30pm.
Wednesday 5th October 9.30am-12.30pm.

Flower pendant
You will be shown how to make a simple flower cane in colours of your choice and then use slices to make a cabochon or disc pendant.

Wednesday 2nd November  7.30-10.30pm
Thursday 3rd November 9.30am-12.30pm.

Tuesday, 23 August 2011

Polymer Clay Wedding Jewellery for my sister

I have been very busy helping my sister prepare for her wedding. My main job was to make wedding jewellery for her and her partner. They came down to look at the jewellery I had and chose what they wanted. Their wedding colours were brown and duck egg blue and I was able to match my polymer clay colours to their fabric colours. Their outfits had matching embroidery on and they wanted pendants with the same pattern.

When I sat down to make it I realised that it wasn't going to be as easy as I thought! I was trying to make the pattern by doing an inlay with the other colour but was having trouble making my carving neat enough that I was happy with it. I thought about making a big cane (if in doubt go back to what you are comfortable with!) but in the meantime had been playing with the faux wood and really wanted to make one of the pendants using that, too complicated to make a cane with faux woodgrain and a swirly pattern!

Luckily for me I was able to attend the London Polymer Clay Group meeting and was able to discuss my technical issues with lots of very skilled and helpful people including the wonderful Carol Blackburn and Christine Dumont, thank you ladies!  It was a great opportunity for which I am very grateful!

In the rush at the last minute (was also making rather a lot of cupcakes for the wedding) I didn't take photos of the jewellery. I managed to borrow it briefly to take some photos the morning after the wedding in a bright spot in the foyer. I'll get some proper photos taken when they get back from honeymoon.

Here's my sister Kirsty's jewellery


Her bracelet.  It start off as a simple swirly bead bracelet, but became a charm style one with the same beads as you see there but she didn't like the chain. This is what we ended up with and it is much more delicate looking than the charm style bracelet.


Her necklace, the same as the bracelet but much, much longer! Struggled to get a good photo. She was going to have a pendant originally but also wanted some crystals, this is a far cry from the starting point but I am pleased with how it turned out.
 Her tiara, a last minute decision after her trial hair appointment, luckily it wasn't too tricky!

 Here's me with my sister on the big day! (If I'd had more time I would of made a tiara for myself too ;)


 Her partner Heather's jewellery


This design didn't change too much from the original request. The main difference is the faux wood instead of just being brown. Once I had learnt how to do with faux wood I thought it would really suit the style of this pendant. I finished it off with a glass like shine from sanding and buffing and a little faux wood bead with some jellyroll slices on a chain at the clasp.

I had a lot of issues with that inlay, I tried a lot of different things, many of them suggested by Christine Dumont - thank you Christine! If I had had more time I could of played about with some of the other techniques and got them to work but I just didn't have enough time with the kids at home for the holidays. In the end this pendant was made carving in the raw clay, baking and then back filling with the duck egg blue clay (which was what I was doing but thanks to the suggestion from my clever friend Sean I lined the circle bit instead of trying to carve it - that was the bit I really couldn't get neat!) I had more issues in the last few stages, including sanding some of the pattern off and loosing it for about 20 minutes whilst it flew out of my hands whilst buffing! I wasn't 100% happy with it until I saw her wearing it - it looked fabulous on!

 Heather's bracelet. She wanted beads of different shapes, like some other bracelets I've made. I included some faux wood ones and some with flowers to match Kirsty's jewellery and lots of swirls as their embroidery was very swirly.
 Here's Heather and I on the big day. Her trousers were brown linen with the same embroidery along the bottom of the legs. The main brown of the faux wood matched that colour.


Congratulations to my lovely sister Kirsty and my lovely sister in law Heather! May you have a wonderful life together full of joy and happiness!


The journey to create this jewellery was a long and twisted one but I learnt so much along the way. I have many more ideas floating round my head, I just need to find sometime to play with my polymer clay!

Tuesday, 16 August 2011

whisking up a birthday present

Here's what I made with that curling petal cane

 I bought a pink silicon whisk, it had a plain metal handle, I made it a bit prettier
and here's a closer view of the handle.

Happy Birthday Helen!

Friday, 13 May 2011

Blogger down - lost post - bangle problems

I guess many of you bloggers know that blogger has been down for a while (since last night for me in the UK). It made me realise that I have no other record of the information in my blog as I wanted to check back on my - things I want to make post to remind me and couldn't access it. Can you back up blogs? Must investigate.

Also I wrote a long wordy post on bangle problems - blogger has probably chosen not to publish it cause it was too long and boring! I will try and summarise it this time round.

I have trouble making solid polymer clay bangles, the often seem to break easily. At first they seemed to break at the join so I now add a bit of polypaste and make sure I smooth the seams carefully. That solved the popping at the seams but now means they break elsewhere instead! See evidence below

 These were made from very well conditioned Kato scrap clay extruded through the largest makins D shape die (about 8mm wide and about 5mm at it's thickest). Joined carefully with some polypaste, baked on an empty coke can at 150 oC (300F) for 40 mins. They broke when I was carefully sliding them from the coke can, the first break was not at the join. Glad they broke then rather than after I had taken the time to cover them  I suppose!


This bangle is made from a sausage of well conditioned Kato clay joined carefully with some polypaste in the join, covered with a decorated sheet of cane slices, baked on an empty coke can at 150oC for 1 hour. It looked fine and felt strong so I wore it for a morning. All good until I decided to sand it. Almost the minute I started gently sanding with my soft micromesh cloth draped over my fingers it broke. It is quite skinny, about 8mm in diameter, like some others I have been wearing which are fine - here's a post about them.

So where am I going wrong with them? My husband has a feeling that baking them for a long time they are strong but brittle and I should under cure them rather than cure them for longer so they are more ductile, less brittle. I was about to start some baking trials for different times when I came across a post from Tony Aquino on the Kato Polyclay Facebook page stating that the higher the cure temperature the stronger the clay will be. I will try and test some different temperatures too. What I need for bangles is something with a little flex I guess. I've had a few suggestions from clever people at the PCC Forum to try out. I will report back with anything I find out, but please leave a comment or mail me if you have any ideas I could try to make bangles that don't break!

thanks

Cara

Monday, 9 May 2011

Purple Flowers,pendants, micromesh and pens

My mum got more birthday presents made by me. I wasn't quite sure how my disc necklace would work out so I went back to something I knew would work just in case - a flowery cabochon. Again in purples. It turned out very well, I'm very pleased with it. She ended up with both.


I recently bought some new micromesh sheets in the 8000 and 12000 grits. Previously I had the basic hobby kit which went up to 6000. The difference in the shine is marked. Polishing up to 12000 grit micromesh means that you can buff to a glass like shine by hand on a tea towel! Add a little mechanical buffing on the dremel and they are glorious! With this one I made the cabochon (hand formed) then I baked and polished it then added the frame and rebaked.  I polished again through the last 3 grades briefly and then buffed. It certainly doesn't look like polymer clay any more!

I also made my first proper pen, with a pen kit rather than covering a cheap biro. Again for my mum, she was a little spoilt I think, but she deserves it!
In theory it's refillable but I had some trouble fitting the parts together so I am not sure how easily it will come apart to put refill in. Again it's polished with the new finer micromesh cloths and it's a thing of purple beauty! I wish I had made my polymer clay bits a tiny bit thinner so it doesn't bulge out from the central band. Next time I will - or I'll just cover the band with a different clay pattern too! I've ordered some more pen kits so watch this space for more. I have ordered some different types to try out. There are so many different ones out there it's hard to know which ones to buy.

I've made some other jewellery bits with the same 2 purple flower canes. As always I didn't make the canes big enough, if I didn't like them I would have lots of it of course! Sometimes canes just really turn out great. With these I love how the colours work together but because I wasn't sure if using all purples would be too much I only made very small canes. Luckily I am getting good at cutting thin so I have made them go a long way.

Friday, 18 March 2011

Latest jewellery - and it's all for me!

I haven't had any new jewellery for myself for a while now, I was busy making sale stock and completing orders. So far this year things have been quieter so finally made myself some new things. Here's some of them

3 blue and white skinny bangles. I am road testing these to see how they strong they are. Baked them extra long to try and make sure they were strong!

Blue and white oval cabochon pendant, I do love this simple blue and white flower cane. This is the second batch of the cane I've made and I can see I will be making more.

The blue and white colours are also the colour palette for this week in the Flickr Colour Palette a Week group - do come and join in with whatever medium you craft in.

Hollow beads made using the technique I learnt on Christine Dumont's Hollow Bead Workshop. She is just about to start an online workshop for these beads so follow the link and check it out.

Hollow beads strung as a necklace


I've more to show you tomorrow. Hope you all have a great weekend
Cara


Friday, 4 February 2011

Choker necklaces and new pendants

Suddenly everywhere I look there are choker necklaces - and they look fab!  I wanted to make some but wasn't sure where to get them in the UK (did have a look on the bead supply websites but didn't find them).

At the London Polymer Clay Group meeting on Sunday, Rebecca Thickbroom  (who is one of the organisers of the Polymer, Pamper, Play event I am very much looking forward to!) showed some beautiful choker necklaces


Rebecca's beautiful choker pendants!


They were inspired by the amazing work of Helen Briel and made using one of her texture stamps

Even the back of Rebecca's pendants are beautiful!

Rebecca was able to tell me where she bought her wire chokers  in the UK and I ordered some.

So I was playing with my rainbow stripe jellyroll cane and planning on making a cabochon pendant with it. I decided to make a round one and use a large cane slice in the middle. I carefully firmed the first slice right in the middle and then looked at it and couldn't see how I could tidily cover the rest without any big black gaps or over lapping the middle slice, which I didn't want to do. And as happens with all the best pieces it just made itself.


 I loved the basic concept but was concerned with how I was going to sand it, I only wanted to sand the cane slice and I had smoothed it flush with the black. Also it was bulky - then I had a light bulb moment ;)

This is the first time I have used a light bulb to cure polymer clay in a dome shape, luckily I had put the last one that blew in my clay supplies for just such a moment (as you can see I was getting carried away with my rainbow jellyroll and signature canes)
So here is the end result of the lightweight pendant which drew inspiration from Rebecca's pendants above. I used a very similar textured back which is beautiful, professional looking and best of all doesn't need sanding - genius! Another opportunity to use my signature cane. I just love this, especially strung on the choker wire (so much easier than making up a cord like I normally do!).


I have a small sale in my local church hall (as part of a friends foot pampering night) next week and I shall be making some more along these lines to see if other people like them as much as me!

Phew! Think I am done for now. Thanks for sticking with it.
Cara x

(still not perfect but better photos at least)

Monday, 31 January 2011

Signature Cane

The main demonstration at the London Polymer Clay Group was by on making signature canes Susan Rimmer, thanks Susan it was an interesting demonstration.

 I have been thinking about signing my work and did play about with a stamp made from bent bits of coke can back in the autumn but I wasn't happy with the results, it wasn't obviously a signature and I mainly sanded it out the few times I tried it. Off course the first one I made was back to front because I forgot it was going to be a stamp image and didn't reverse the letters.


So here's the cane I made after Susan showed us how she made a 2011 date cane (wonder if she'll use it?)
Before reduction 4.5 cm across (See that green smear at top - must remember to  clean my blade!)

The smallest is 5mm across (I see I didn't trim the second smallest back to the neat part and they could be more square!)
I thought I would like to incorporate the flower I use on my logo (shown below in case you haven't seen it already)


I was thinking about adding a flower on to the outside of the cane I already had when I was struck by inspiration - why not put it in the loop of the J?  I had kept part of the original cane large (4.5cm across, I got carried away!) so I did some surgery. I didn't want to cut the letters because I was worried about not rejoining accurately so it was a little tricky. I had to make the flower smaller than I would of done as I couldn't get in to trim out the clay easily.


The flower is in pearl but I decided that would help it stand out a little. I quite liked it this size. 
I had noticed that my J lost some of it's curve on the bottom loop on reduction with the previous cane so I thought I might try and encourage it to stay round with a little extra clay - 2 little sausages on the bottom as shown below.


Here it is reduced, my cunning little snakes didn't work, seems obvious now on hindsight what would happen but you've got to make these mistakes - it's learning you know! The little snakes compressed the black line of the J making it look broken. The flower is also quite tiny and the pearl when squished down looks darker.

I want to add a border but am not quite sure what. I wondered about using a zebra cane....


..but I think it's probably too fussy. Might work better thinner maybe? I will have to play about with it a bit. Am I going to use it? Well really I would like to remake another one with a bigger, white flower in the J as I construct it but I have lots of other things on my to do list that are more important. I am preparing for a small sale in just under 2 weeks time so perhaps I will put some on my new stock just to see how they look. I'll let you know.


Sunday, 30 January 2011

Name badge


I was lucky enough to be able to go to the London Polymer Clay Group meeting today (thanks to my parents for looking after the children as hubby was busy shock horror!). I decided to make myself a name badge yesterday evening so it was made in a bit of a rush (one day I will learn not to be so chaotic but until then last minute it is....). The photo too was taken in a rush and the lighting is terrible. It is on my list of things to do in Feb to try and sort out some better lighting for both taking photos of my work and for my sale table -hoping it can be the same lights I use for both.

I had a lovely day out in London, 2 hours of peace on the train would be a treat enough but to go and talk polymer clay with nice people who understand, to see so many lovely pieces of work by the talented members of the group and to be shown some new techniques is fantastic. Unfortunately I can't make the next meeting as it is on my youngest daughters 5th birthday but I do have Polymer, Pamper, Play to look forward too in March! A whole weekend of polymer clay!!

I hope you all get time to be creative with friends too.
Posted by Picasa

Monday, 29 November 2010

Pasta Machine Thickness comparison table

Since I started improving my polymer clay work by following tutorials and going to workshops I have found it very confusing when people give you a pasta machine thickness as the different brands (particularly Atlas and Imperia the main 2 quality machines) don't compare easily. I have an Imperia machine which I love, it is easy to take apart to clean, only requiring to remove the end plate on one end (the one without the knob) with 1 screw and then I can push out the rods by hand and clean the scraper plates. I recently acquired a cheap Kitchen Craft pasta machine which looks like an Atlas but it doesn't run smoothly and the clay always wrinkles up on settings 8 and 9 - I would pay the extra and get a quality machine if you can.

I spent a lovely day in London yesterday with the London Polymer Clay Group (it was a blissful 2 hours on the train from me which I thoroughly enjoyed and I managed to squeeze a flying visit in to the jewellery gallery at the V&;A museum too!). I had already made thickness chips for the 2 machines I have and Nina kindly allowed me to make a set on her Atlas so now I have all 3! Here's the measurements
This is what my chips look like

 They will probably be a bit different from machine to machine and possibly even from different sides of a sheet depending on how straight the rollers are but hopefully it's a useful starting point.

So if you want to compare I would say as long as you remember a 1 on an Imperia is about the same as a 2 on an Atlas, 3,4 and 5 are much the same and the thinnest on an Imperia is like a 7 on an Atlas.

(Toni the table won't be visual enough for you - your machine is very close to the atlas measurements)