Showing posts with label Kato. Show all posts

Monday, 11 August 2014

Polymania UK 2015

Polymania UK 2015 is a 3 day polymer clay workshop weekend  13-15th March 2015 in Bristol, UK.
The tutors are Donna Kato, Bettina Welker and Cara Jane Hayman (me :) )  For more details see the page on my new website - www.carajane.co.uk/polymania2015
Polymania Polymer Clay Workshop Bristol UK March 2015 with Donna Kato, Bettina Welker and Cara Jane Hayman


I have a new website and blog now which is why there haven't been any posts here recently - you can find the new blog here - www.carajane.co.uk/blog

Thursday, 21 February 2013

Demonstrating at the NEC

As you are probably aware I am a huge fan of Kato polyclay so I was over the moon when I was asked if I could demonstrate with it at the Craft, Hobby and Stitch International trade show at the NEC last weekend. I spent 2 whole days showing people the magic that is polymer clay - I can't think of anything better to do (well apart from spending 2 days being shown how to do new things with polymer clay!). I was amazed at how many people in the craft industry hadn't even heard of polymer clay before!

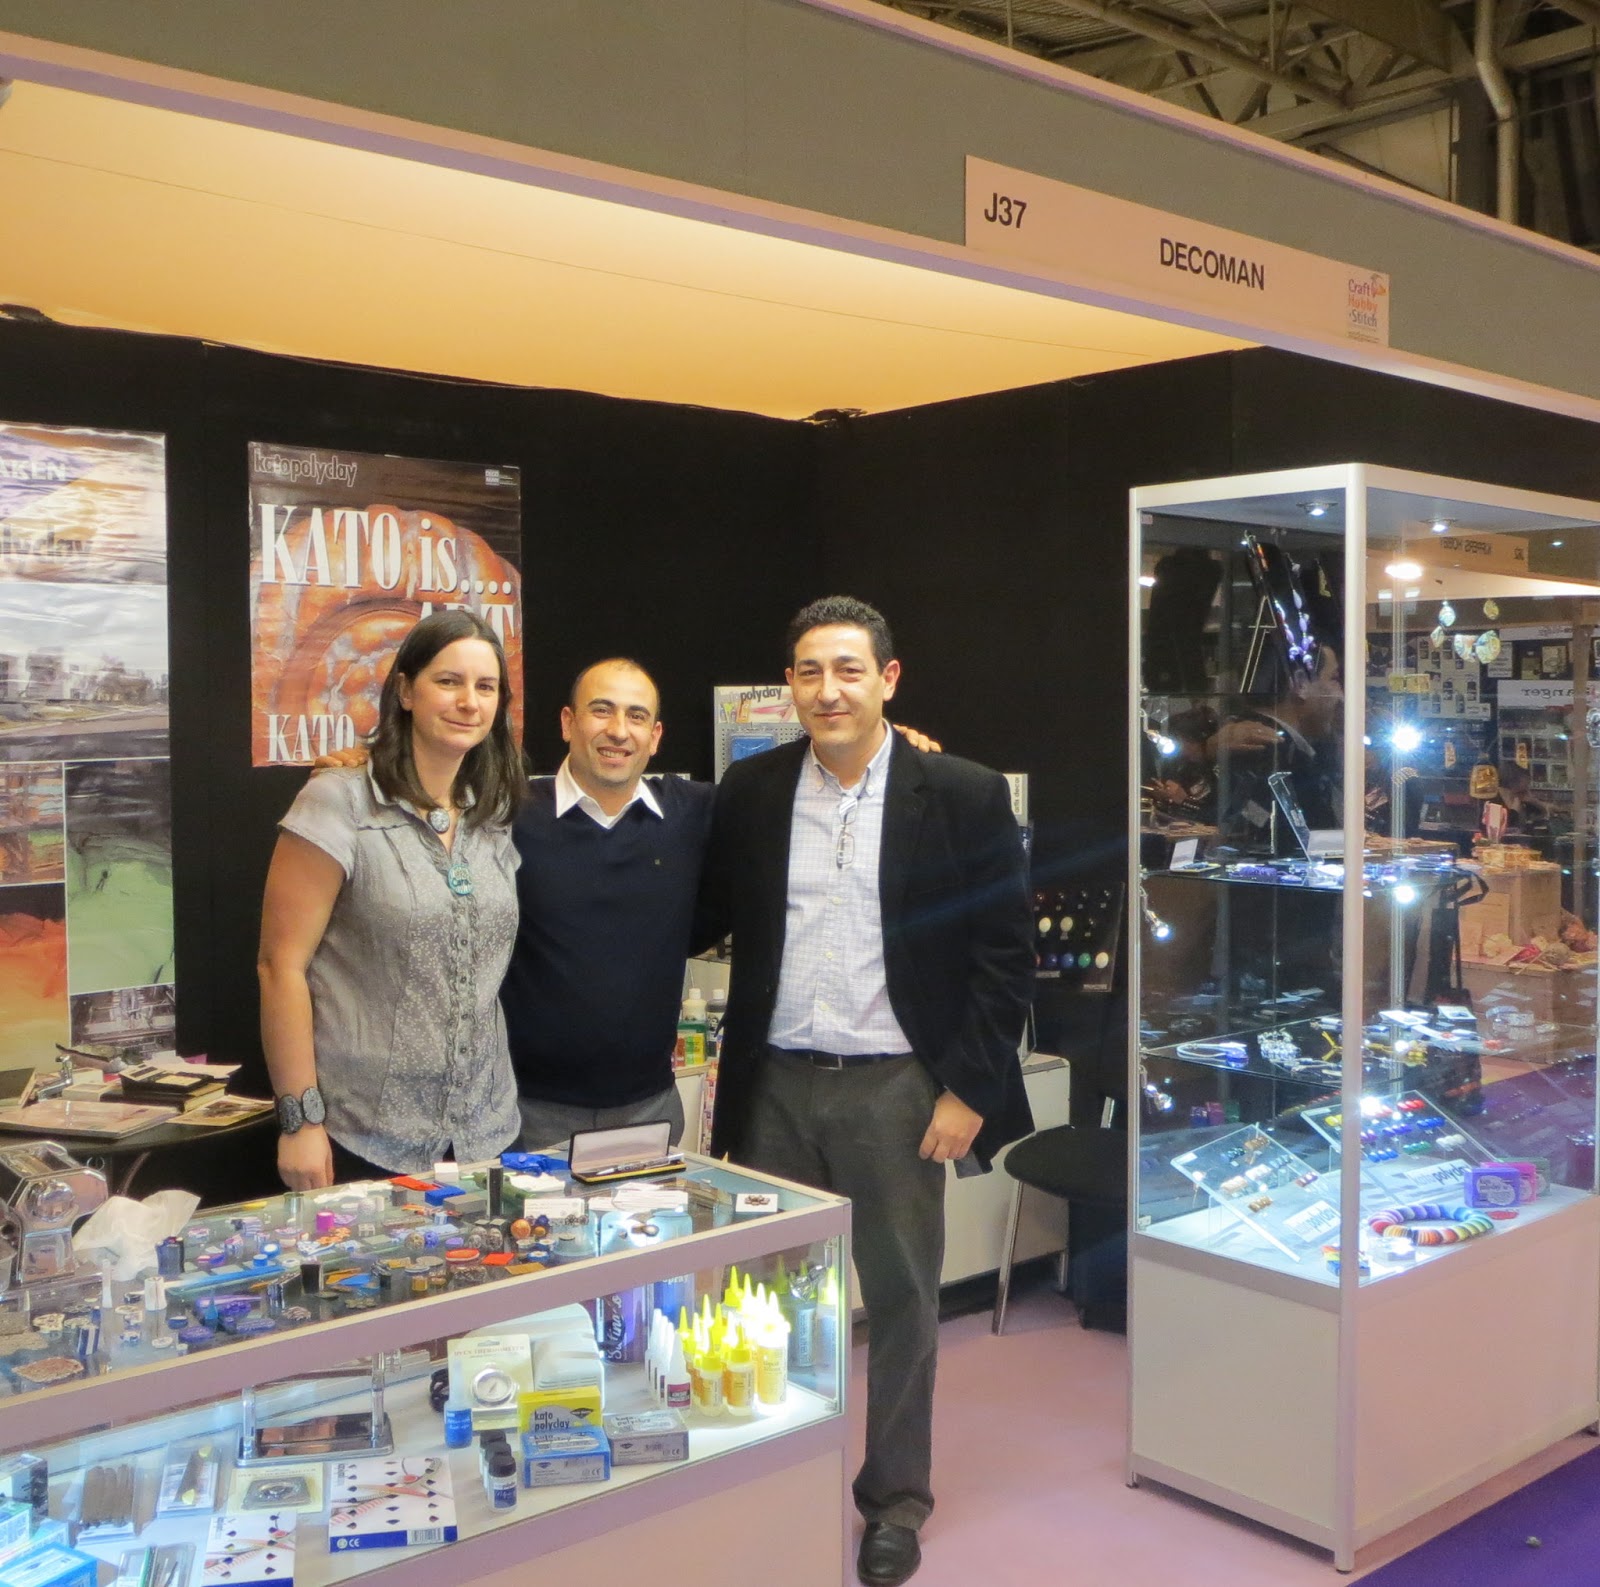
Here I am in the Decoman booth - in a quiet moment when you could see past crowds of interested people! Decoman are the European distributors for Kato polyclay.


I made a lot of different things - mainly cane work and mokume gane as they are fairly simple to show and impressive to see. Here's some of what I made.


There was plenty of beautiful jewellery on show in the big glass cabinet, some of it mine and some from other artists such as Donna Kato - it caught a lot of people's eyes as they were walking past! It was a real pleasure to be a part of the Decoman team!


Since I've been back I have been busy working on something I can't show you yet - so I have been making things for my thing a day challenge but I can't share them.

Tomorrow I am off to demonstrate at Hobbycraft in Cribbs Causeway Bristol from 10am -1pm. I am also teaching a workshop there next week on Friday 1st March 10am-12.30pm. I still have 2 places left if anyone is interested please get in touch

Wednesday, 30 November 2011

From Polymer To Art - Purple - I'm in it!


Hurray I have just received my copy of From Polymer To Art - Purple! I'm so excited because have an article in it! You can see me in the top left hand corner of this 'contents' picture.

I was asked to write an article about my curing experiments. If you have been following my blog for a while you will probably have read all about my tests to try and cure Kato clay so that thin bangles wouldn't break. I also did some tests with Fimo soft to see how the curing time/temp effected the strength of Fimo Soft - you can read about it in the article in the magazine. I will publish those results of my Fimo tests here in a while, and I have more tests planned too for the new year (slightly busy with Christmas just now!).

Thank you Saskia and Marjon for giving me to opportunity to contribute to your wonderfully colourful magazine!


Wednesday, 7 September 2011

Test - should I quench for translucence?

When I was doing my curing experiments I wondered if the quenching, plunging into ice water straight from oven, really did help with translucence. I had a few things ready to cure made with translucent Kato clay so thought I would quickly test to see.

I made 2 samples from translucent Kato polymer clay on a mid thickness in the pasta machine, setting 5 on an Atlas. Not sure of my reason for the  thickness, just what seemed right at the time. On reflection I may have made them thinner as any difference may have been clearer .... next time!

I cured them at 150°C for 20 mins and then plunged one into ice water and left the other to cool at room temperature. There is a fair amount of plaquing in each, I think it is due to cleaning the pasta machine rollers with a baby wipe just before conditioning this clay. Here they are placed over some bold text.


The sample on the right, with the bit  missing (cut out on purpose so I could identify them!) was the one plunged into ice water. After much scrutiny I decided that perhaps it was slightly more translucent, the text was slightly clearer through the clay (it is actually clearer in the photos, I was going to write it didn't make a difference until I imported the photo, on checking again I can just about see it in real life too). It isn't a huge difference though and as the translucence wasn't critical,  I didn't quench my items.

I want to investigate this further, I need to try a slow cool sample to see if that effects the translucence for items that require extra strength. I'll keep you posted if I do but do let me know if you have any translucency tips.

Cara

Thursday, 2 June 2011

Curing experiments part 2 - with videos!

So in part 1 I discovered that for optimum strength you should turn your oven off at the end of the curing cycle and leave your polymer clay pieces to cool down slowly in the cooling oven. This was just an initial test to see if the set up was going to work before I made lots of samples with more complicated curing, and something I had always been curious about. I was happy that the test worked and set about making more samples (got a blister from the extruder - am thinking it might be time to look at those walnut hollow ones....).

For these tests I chose to cool all my samples at room temperature, although I knew they would be stronger if I let them cool slowly. It was easier to control the curing, meaning I didn't have to reheat the oven for each curing and also the testing would be quicker if the specimens weren't as strong There will be a third round of tests where I search for the real optimum curing based on what I have learnt so far. As before samples are all made from very well conditioned scrap Kato polymer clay. They are extruded cylinders and are approximately 10 cm long and 6mm in diameter. You may note, looking at the results below, that I only repeated each test twice this time. I made three samples each time but as the results were reasonably close and there were a lot to test I decided that two was enough! I haven't got round to polishing the samples yet, to see how shine is affected by cure time/temp - that's a job for another day!

Cure time tests
I  tried curing samples for different amounts of time. The temperature for all the samples was 150°C and they were removed from the oven at the end of their cure time to cool at room temperature. The samples cured for 40 min had some longitudinal cracks on them when they were removed from the oven, however there was no sign of the cracks when they had cooled.

Cure time results
10 min -breaking point weight -  501g, 481g
20 min - 2035g*, 1986g*
40 min - 1900g*, 1935g*
*weight of water when specimen bent out of jig.

The weights given for the 20 and 40 min cure samples are not particularly relevant as these samples didn't break, they curved so much they slipped through the test rig. You can see this happening and the test set up in the video below.


Video showing the test set up and how the strong samples bent and slipped out of test jig.

Having looked at the samples I conclude that for 6mm thick pieces 20 minutes curing is sufficient for  strength and perhaps 40 min is too much due to the presence of the cracks on the warm sample, although this wasn't proved to make them weaker.

Oven temperature tests
All samples had 10 min in the oven at a set temperature that was verified with an oven thermometer, they were then removed and cooled at room temperature.


Oven temp results
140°C (~280F)- breaking point weight -440g, 380g
150°C (~300F) - breaking point weight -501g, 481g
160°C (~320F)- breaking point weight -1076g, 900g
170°C (~338F)- breaking point weight -1567g, 1498g

As you can see that change from 150°C to 160°C and again to 170°C makes a significant increase in strength!

Here's a video of a 140°C sample so you can see how little it flexed before breaking, compared to the 150°C for 20 min sample  in the video above.

Video showing a test where the 140°C for 10 min cure specimen breaks without much bend


In a recent post on the Kato facebook page (31st March if you want to look back and find it, can't find a way to make a direct link to that post) Tony Aquino,  the technical director at Van Aken, who manufacture Kato polyclay, discussed curing temperatures (great timing thank you Tony!). He said that higher temperature of curing would mean stronger clay, my tests show this too.

Conclusion of my experiments so far

Increasing the cure temperature increased the strength of the sample significantly but the samples still all broke. Increasing the cure time meant that the samples were much stronger and held about  2kg, or 2 litres of water before they bent so much they slipped through the test jig.  That may be to do with the increased time allowing the temperature in centre of the specimen to reach the correct temperature or some other factor, I'm not sure.

 I would like to do some more tests looking at cure time against thickness of specimen so that I would know the ideal time for all thickness of clay. Next time I am bored I guess!

I will cure my next specimens at 160oC (320F) for 20 min, and leave them to cool in the oven as it cools down. This would seem to be the best way to cure 6mm thick Kato Polyclay  for optimum strength. I will test this and let you know the results.

This blog will soon be finding a new home, I do hope you'll move with me - I'll keep you posted

Have fun with your polymer clay
Cara

Tuesday, 27 April 2010

Colour mixing

As well as making my mums birthday present (will show you soon - can't show you now as she might read my blog) I am also making cake forks for my other sister in law. She has Dorset Fruits Crockery by Poole Pottery so I decided to make her some matching cake forks. She has a set for each of the family with their own fruits and they have plums (as shown), apples, grapes and pears. I am still experimenting with inlaying or having a raised fruit (much easier!). Resisted the temptation to make fruit canes - overkill for 6 cake forks!
Dorset Fruits Plum Plate.


Anyway nearly all the colours I needed ( a yellowy cream for the background, a dark ultramarine blue, crimson red for the apples) are colours I haven't mixed before in Kato and it took me quite a while to figure some of them out. I am so pleased that I now have enough knowledge to be able to work out colours!

I was struggling with trying to think what colours I needed to make the crimson for the apples when I suddenly remembered I had printed off some Kato colour recipes from various sources on the Internet and wondered if they might help. In the folder with them I found the  Kato Colour Mixing Chart I had completely forgotten about. Wow that made life easier! I matched the colour  I needed to the chart and just slightly adjusted the amount of black - ta da perfect colour in a few minutes instead of about 30! Going to laminate one for my clay box!


The Kato colour chart I found along with some other useful recipes such as premo colours in Kato at http://www.shadesofclay.com/index.html . Hope it is useful to some of you Kato users out there!

Sunday, 25 April 2010

Conditioning Kato Clay

Having recently discovered Kato clay I am now a complete convert. I love the Kato clay to work with and I now find Fimo too soft and sticky (although I now realise this is a problem with fimo at the moment). The problem with Kato is it is SO difficult to condition. I haven't tried the latest formulation of Kato which is supposed to be easier to condition yet.

I have tried some different methods for conditioning Kato clay and here are my findings.

As I would Fimo
With Fimo and Premo you can just squash up a bit of clay and roll it through the pasta machine. The odd block of Fimo would be a bit more of a challenge and would need a bit of squishing and rolling in your hands first before it was soft enough to be rolled in the pasta machine.
This doesn't work for Kato, it is too firm for me to squish into a ball from the packet and many blocks just fall into crumbs the minute you try.

Cutting slices
I found out about this from Sue on Cindy Leitz's blog, she passed on the information given on an Australian clay suppliers website Over the Rainbow. 


Cut a bit of clay and roll it firmly to flatten the clay. Lift it and turn it so it doesn't stick to your work surface. Keep rolling until it is just a little thicker than the thickest setting on your pasta machine (that's a good time to get those thickness chips out to see how
thick it needs to be).Roll the clay through the pasta machine on it's thickest setting. Without folding or bending the sheet roll it through a thinner setting. And again without folding another thinner setting, the aim is to make a thin sheet as thin clay conditions faster. When you have thin sheet fold it and roll it and continue doing so until it is conditioned.


This works but it is slow and I am impatient. Each slice is small and if you are using big amounts of clay it takes far too long. The secret I worked out at last is the initially rolling. If the clay is crumbly roll it more with the rolling pin first or you get crumbles in the pasta machine as shown (I hate that!). I try to short cut putting several sheets together but I think it is best to have them part conditioned first on reflection before bulking up. This is also basically the method recommended by Donna Kato herself and she should know!


Food Processor


I bought a little chopper just for clay. I found I could put about 2oz of clay in at a time without stressing the motor (getting horrible grinding noises) as long as I chopped them into pieces about 2x1x1cm. Run the chopper in bursts until the clay is lots of fine pieces. I then find it easiest to put the clay crumbs into a Ziploc bag and then roll them with a rolling pin in the bag. This helps the crumbs to stick together with no fear of loosing them. The clay is nice and warmed up by now and should go through the pasta machine no problem. A couple of rolls and it is ready to use.

To be honest this is a fair bit of hassle too. It's great if you are colour mixing from a recipe as you can just put the parts in the chopper and it is more than half mixed already. I am buying big blocks of Kato the 12.5oz ones so will probably have a conditioning session at the start of a project using the chopper and then store the clay in sheets. They can easily be reconditioned by passing through the pasta machine.

The bottom picture shows what it looks like out of the Ziploc bag on the left and after first pass through the pasta machine on the right.


Jana whack
This is the method used by  Jana Roberts Benzon. Basically you take your block of clay and whack it. Leave the clay in the wrapper and whack it with a hammer, rubber mallet, wooden rolling pin. Works pretty well and is a good arm exercise, tension reliever. Not ideal with those who have problems with hands/arms and it means getting stuff not in my clay kit out. You still have to do a bit of rolling to get it thin enough to go in pasta machine but no crumbs in sight!
(more info in an article at Polymer Clay Express )

Conclusion

Since I wrote this I have found that if I am colour mixing a fair amount of clay I use the chopper but other than that I tend to use the slice method cause as long as I roll well to start with crumbs are avoided and it saves getting extra kit out. I am using the big blocks of Kato so I do 1/4 block at a time - about 3 oz. This would be 3 slices so it isn't so bad.

Anyone else got any conditioning tips to share? I have heard people talk about driving over it with their car but that's a bit extreme for me I think!

Tuesday, 16 March 2010

Brand Comparison (sorry if you have seen this already)

For years I used Fimo polymer clay which is readily available here in the UK. Recently I found Cindy Leitz and having read a lot on her blog and seeing her beautiful colour mixing recipes I decided I ought to try Premo clay. There are some discussions about brands on Cindy's blog here. Being a fan of Donna Kato's work and having her excellent book I decided to try Kato polymer clay at the same time.

Here are some photos and notes about the different brands of polymer clay I tried;Kato, Premo, Fimo Soft and Fimo Classic.


First findings:
Kato - Very crumbly as it came out of the packet. Had to work it to warm it up before I was able to run it through the pasta machine. Firm, more difficult to shape. This polymer clay has quite a strong smell.

Premo - Very soft from the packet and was able to put it straight through the pasta machine. Soft to work with.

Fimo Soft (my normal brand) - Soft from the packet was able to put straight through the pasta machine. Very soft to work with.

Fimo Classic - I found this much the same as Fimo soft which surprised me. It wasn't quite as soft when first out of the packet but after being passed through the pasta machine a few times is was just as soft as the Fimo soft.

Flower Cane
First of all I made a Spliced Flower Cane in Blue, White and Green. I tried to keep the colours  the same as possible but didn't go to great extremes of colour mixing (I'm not that good at it - yet!)

 
Kato, Premo, Fimo soft and Fimo Classic (from left to right)
The top row was a slice cut with a tissue blade just after the cane was finished and the bottom row is the same brands cut after a rest (overnight).

I realised that my blade wasn't as sharp as it used to be but this didn't seem to matter for the firmer Kato clay. I am sure I can improve my cane slicing technique (and I have also since bought a new blade).

I can see very clearly that it pays to leave your clay to cool down before slicing what ever brand you use. I know many people recommend putting it in the fridge for a while - I must try that.

Wow the difference shocked me - the Kato one (made in exactly the same way) looks very different. I accept there may have been a slightly larger area of white in the middle but even so the definition that the cane retained is far superior.


A closer view of the Premo and the Kato flower cane slices

Geometric Cane
I realised that the spliced flower cane wasn't a completely 'repeatable' cane so decided to make a simple geometric cane to see how that turned out.

 
From left to right Kato, Premo, Fimo Soft and Fimo Classic
Again top row was cut straight away and the bottom row was cut the next day.

As I was making them I thought the fimo looked different but couldn't work out why - hmm I realise now I only did half the job. Not sure what happened to the next day kato sample but needless to say it looked much the same, insignificant deformation.

Although the difference wasn't as marked as the spliced flower cane - I still much prefer the results of the kato. I like the feel of the baked kato too.  The Kato white is more white and I think part of this is being firmer it stays cleaner.


 A close up of the Kato and Premo canes

Conclusions

As I was working the  spliced flower canes I thought I would prefer the Premo. I didn't like the work needed to condition the Kato clay and it was much firmer to work with even when thoroughly conditioned. The firmness is sometimes a disadvantage and sometimes an advantage. It was a disadvantage making the splice flower cane in the pinching the sides down. Also squashing the cane stacked quarters into a flat piece was quite physically demanding with the kato clay. At other times the firmness was an asset, cutting the bullseye canes into quarters was easier, less deformation. Things held their shape better and weren't floppy as they were with all the other brands at times. There was much less waste with the Kato et every stage. Even making skinner blends there was less waste from the Kato as it distorted less.

It is very much a personal preference and all sorts of things will effect your choice from where you live (temperature and also I gather some of the brands have slightly different formations in the states to UK), how you buy your clay (I have to buy Kato online can't get it in any local shops in the UK), the strength of your hands, what you like to make, how you work etc. Also if you don't want to mix colours the Kato range is rather limited.

However after I had seen the sliced and baked canes my mind was set - I'll give this Kato clay a go. I will probably invest in a little chopper to aid conditioning it isn't something I enjoy but I would say the results make that extra effort worthwhile. 

I am currently wriritng an article on conditioning Kato clay having tried out several different ways - coming soon.....

(when I first set up this blog I didn't understand how it worked and made this as a separate page. I have decided to post it here too in case people missed it on the other page - there are some comments on the separate page version which I can't or at least don't know how to copy over)

Thursday, 11 March 2010

Kato Colour Chips

Now I have decided on a brand to use, Kato Clay I have started working my way through some of the exercises in Maggie Maggio and Lindly Haunani's book- Polymer Clay Color Inspirations . I am no colour expert having had no formal art training, I did a science degree and worked in scientific research for a while before retraining to teach in Primary Schools (4 to 11 year olds ). I do know the basics of colour mixing but I struggle a little with the polymer clay colours as I haven't mixed them much in the past and also I struggle combining colours in projects.

My kind neighbour took the kids out for a couple of hours and my lovely husband went to do the food shopping so I settled down (with my leg up) to make some colour chips. The recipes in the book aren't ideal for kato as they suggest using 2 different yellows and 2 different blues. These colours are available in Premo and Fimo but there is only 1 blue and 1 yellow for Kato. I played about with the quantities a bit to make some different colours.

I enjoyed fiddling around making new colours and I can see these chips will be useful in future as I can pick up the colours I want to use and then check the back for the recipe to mix.

 Tasting tiles or colour chips in Kato Polymer Clay. Blob on top is colour mixed 1:1 with white and there is a pie chart recipe on the back.

I spent the night dreaming of colours which was a new experience for me and I can't wait to try and mix some more.

Wednesday, 10 March 2010

Kato extruder beads

I just realised that although there is a fair amount of talk on flickr and in the comments about these brown Kato Extruder beads I haven't actually posted a picture of them here. I know you have seen the necklace which uses a disc pendant and some smaller beads using this technique but here are the beads I made first. I am writing the tutorial as we speak! It'll be here soon.

Actually made some jewellery!

Last night I delved into my big box of polymer clay things and liberated some to become jewellery. Here they are.


Here are some of those Kato extruder technique beads (the tutorial is being written!)
I am really pleased with how this turned out. Although normally I really don't like brown or orange, somehow I love the colours on this. I wouldn't wear it as it wouldn't go with my normal colours so I will have to make the same but in different colours I guess. Probably turquoise and green.


Here is a purple creation made from a few bits of scrap and a couple of purple sparkles. It's a little on the random side but I quite like it. This is that same Kato extruder technique with purple, magenta and white.


Here I am wearing a necklace made from the Kato spliced flower cane I made as part of my brand comparison trial. I only made a small cane and I just about managed to squeeze 3 slices from it. 


Close up of splice flower cane beads


I spent this morning making a bracelet from a kit I was given for Christmas 2 years ago!It is jangling as I type, and definitely not recommended for wearing whilst working with clay lol.

Blue glass beaded charm bracelet

I would like to say a huge thank you to my wonderful mum who has not only given up the last 3 weeks to look after our family (whilst I am on crutches after having an operation on my foot) taking the kids to school, shopiing, cooking, cleaning, washing etc. but has got out all my clay things for me everyday, and tidied them up! She bought the bits I needed to complete the brown necklace at the weekend and has been a great artistic sounding board!

It feels really good to actually make somethings rather than leave all my beads and bits in a box waiting to be brought to life. I hope to liberate some more soon (another sanding session in order...)


Wednesday, 3 March 2010

Great links from Doreen


Having posted about Doreen's giveaway on her blog she kindly visited my blog and left some really useful comments. I have decided to post them here so you can all benefit from them too. I only discovered Backyard Beads today and I had a good nose around  but clearly didn't go back far enough as I missed these useful posts.
 

Doreen said...

I have tried all the clays. I like Kato the best! Here are a few resources for color mixing. I've posted on my blog about some of the tools I use
 http://www.shadesofclay.com/more/Images/Colour%20Mixing%20Chart.jpg
http://polymerclay.craftgossip.com/kato-recipes
http://www.shadesofclay.com/more/Color%20Recipes.htm
http://doreenwilley.blogspot.com/2009/05/kato-polyclay-color-mixing-guide.html (expensive, but really handy)
http://doreenwilley.blogspot.com/2009/02/more-about-color-mixing-and-matching.html (I love this!)
Hope this helps :)
 I am writing this whilst sat on a bag of crumbly Kato to try and warm it up to make it less crumbly ;)The 3 in 1 color tool Doreen mentions in the last post is available from amazon.com but not the UK amazon - so typical!

Saturday, 27 February 2010

Brand comparison

I have finally written up my polymer clay brand comparison trials. You can find them on my blog here

For me, for making canes I am now sold on Kato. The clay is very firm which helps to keep good definitions in the cane (once you have made it workable).

Here is one of the canes I have made from Kato clay.
 
This is a pendant with a crystal added to the centre


A smaller slice made into a simple bead

This cane was made using a tutorial I bought from  Sigaliot Designs Etsy Store.
It is a great tutorial, very clear and easy to follow and I was stunned with the results I got first time. It is also a beautiful tutorial Sagit has really taken time and effort over it. You can see more of her work at her blog http://www.sigaliotdesigns.blogspot.com/