Showing posts with label paisley cane. Show all posts

Thursday, 27 June 2013

Paisley Cake Forks 2013 – using old canes.

(Posted on June 23, 2013 on my new blog www.carajane.co.uk/blog)

Way back in March 2010 I made a set of Paisley cake forks – it was the first time I had attempted such a big and complex cane. I had a lot of fun and learnt a lot and had a fair bit of the cane left over due to a miscalculation and lack of experience (blog post about making the cane here). Here’s the cane after reduction (blog post about that here)
polymer clay paisley cane by Cara Jane 2010
Polymer Clay Paisley cane made 2010
And here’s a picture of the cake forks I made in 2010 (blog post about making the cake forks here)

cake forks decorated with polymer clay in a paisley pattern by Cara Jane
Paisley cake forks 2010

Earlier this year I was commissioned to make a pair of similar cake forks. Now I’ve just told you I had some cane left over – great! It’s over 3 years old so I was a little concerned about it but it worked very well. You may be interested to know this was Kato polyclay.
The bits of cane I had left have been stored in a polypropylene storage box (blog post here on storing clay). I reduced bits of the cane to different sizes and used up most of the smaller bits for the cake forks. I mainly had bigger chunks of cane left which meant I had to reduce them to the smaller scale needed for the cake forks. To start with I tried to reduce it like I would a ‘fresh’ cane but the cane just cracked into 2 parts. So I slowed down.I held the cane in my hand for a while to warm the clay up and working it gently pinching it all round a little at a time I was able to reduce it without further problems.
I then started making a decorated sheet  from the canes to wrap around the cake forks. Some bits of cane were the right size , didn’t need reducing, so I just sliced them – they sliced beautifully being rather firm after being sat for 3 years! I worked on a sheet of purple clay, covered it in cane slices and smoothed them in. Back in 2010 I had worked on small sections at a time and made a whole big sheet I cut parts from. Now I used scrap clay to work out what size I needed to cover the handle and just made a sheet that size. That way there was much less waste. I also just added all the cane slices at once as I know now they will all smooth in no problem. In 2010 I smoothed the slices by rolling them  now I burnish them which causes much less distortion.
It all looked great until I tried to wrap it round the fork handle when massive cracks appeared. I realised they were in the unreduced canes and between the unreduced canes – they weren’t ‘sticky’ enough to fully join to the surrounding cane slices. The sheet was useless :(  I had to make a whole new sheet but luckily I did have plenty of left overs and I had only made a small sheet so hadn’t wasted too much cane or time! I got round the cracking problem  by holding the unreduced cane slices in my hand to warm them and then just manipulating them a bit so that although I didn’t really reduced them the clay softened.
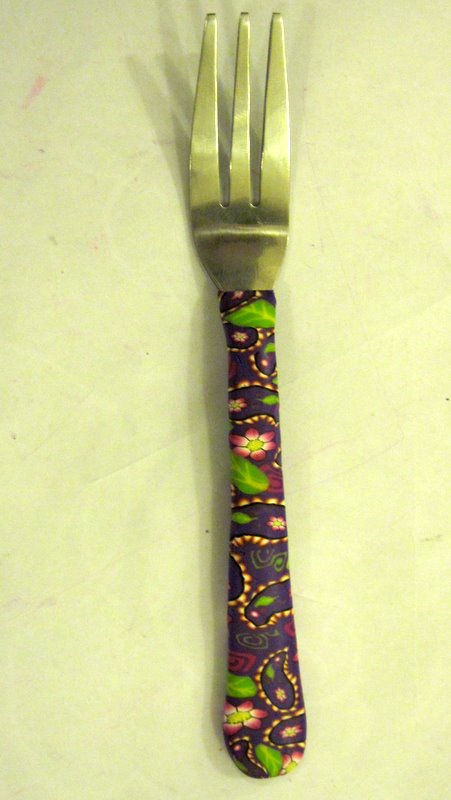
So I made a beautiful sheet of purple paisley patterned polymer  and used that to decorate the cake fork handle. I realised when I finished them just how much I have learnt in the past 3 years. The cane was exactly the same cane I had made but the end result was much nicer. I have a different method for wrapping the handle which means the join is not so obvious on the back – I didn’t take a photo of the back either time unfortunately but in 2010 there was an obvious seam up the back and in 2013 there isn’t. The quality of the finish was much better too, they were pretty  nice in 2010 but these 2013 cake forks are perfectly smooth and have a beautiful shine to them.
Polymer clay decorated cake forks - purple paisley by Cara Jane
Paisley Decorated Cake Forks 2013

Whilst my photo isn’t the most amazing photo I can see looking back at my old blog posts that my photos have come quite a long way since 2010! It is good to take stock and look at where you’ve come from. Go back and look at what you were doing 3, 5, 10 years ago! Look how much you have improved! Hard to see it when you work with the same materials day to day but easy to see when you jump back in time. I hope to enjoy looking back at this at some point in the future and seeing how  much further I have progressed!

Tuesday, 23 March 2010

Lentil Swirl Bead Tip for Patterns

Well if you have made a lot of lentil swirl beads you will already know this but in case you haven't here's something I learnt about patterns today (I don't normally swirl with patterns usually it is just a pile of scrap).

I carefully placed a flower in the centre of the ball I started swirling thinking it would look nice swirled - but it disappeared!
Swirl lentil bead that started with a flower in the centre that 'disappeared' 

Desiree does say in her excellent tutorial on making lentil swirl beads that the rotation does draw the clay from the outer areas towards the centre of the bead. With pattern this means that the pattern at the edges expands and the pattern in the centre shrinks to the point of almost disappearing at the very top of the bicone. So when choosing where to place your round ball to start swirling put the pretty bit off centre! If it is in the middle it is likely to shrink very tiny the outer edge gets huge and somewhat distorted so the best place for that pretty flower is somewhere between the two.


Swirl lentil with flowers placed between centre and edge

This was using up my offcuts from some Paisley spoons I made for presents today (oh and one for me too ;).
I have refined my technique and can now make the fabric up (from the preprepared canes - I still have plenty!) and cover 6 spoons in about an hour. I have a feeling I will be making plenty more so that's good news.

Monday, 8 March 2010

Paisley Project Completed

So as you know I reduced the Paisley Cane to the size I wanted to make up a polymer clay 'fabric' to cover some cake fork handles for my sister in law's birthday. I played about with the best way to cover the fork handles. I have made many decorated forks and spoons over the years but hadn't every really experimented with how to do it best. I will share that with you another time.

First I cut lots of slices from the different canes I wanted to make up the pattern - and yes my lovely husband did make me a cane slicing jig!

The cane slicing jig.
The wooden strip pushes along so you can cut a slice using a blade against the metal edges. I stuck a metal ruler under it so I could make slices the same thickness but actually for the fabric I wanted them about 0.5mm so I just nudged it gently every time. My slices are now of even thickness instead of being wedge shaped! Thank you Richy!

Once I had a fair few slices of canes I started to add them to a very well conditioned sheet of purple clay. Being Kato clay I was worried I wouldn't be able in embed the slices easily if the clay firmed up. I put a section on and then gently rolled it in several directions so that the surface was fairly smooth.

Embedding slices to decorate the 'fabric'

I cut more slices and embedded them and yet more! Once I had a piece large enough I was ready to cover the handles (I'll share that in depth another time).
  
 
Here is a covered cake fork, ready to be baked
 
When I was covering the handle of about the 3rd fork the clay startede to crack a little at the sides. Oh dear! I got round this by gently rolling the piece I had cut to cover the handle a few times. Not enough to change it's thickness or shape just enough to reawaken the clay the enough to be smoothed round the handle.

Sanded them with several grades of wet and dry sandpaper up to 1200 grit by hand and then buffed them on a linen tea towel (the best thing I have found so far although I read today fleece was good so will try that next time). They look amazing! The photos don't really do them justice. I am now a believer in sanding and buffing (something I hadn't really done before the last couple of weeks).


A cake fork

The whole set!

The don't really look at all how I imagined and I still have a lot of that paisley cane, so much for all my careful planning! But I am really pleased with them. They are smooth and shiney (but not too shiney) and I like the way the pattern worked out. If my sister in law doesn't completely adore them I shall kidnap them back!

Saturday, 6 March 2010

Paisley Cane Project part 2 - reduction

*** See all this content and new content on my current blog - www.carajane.co.uk/blog ***
This post can be found here http://carajane.co.uk/2010/03/paisley-cane-project-part-2-reduction.html

So after I tried the playdough reduction method again  more or less sucessfully last night I decided to use that way to reduce the big Paisley cane (see a video of the technique developed and kindly shared by Idit Zoota  http://www.youtube.com/watch?v=4ecS_Sa0KbM, also Zuleykha demonstrates how to use it on her blog.There are also pdf instructions available at  http://www.artbyyonat.polyclayplay.com/ but I can't get onto the site today for some reason.). I have never made a cane this big before and Kato is so stiff the thought of reducing it was scary! I weighed the cane and it was 1lb in weight, that's a lot of clay!

So I covered it in a medium thickness sheet of Playdough and then realised just how much scrap clay I would need! I have only been working with Kato for a few weeks so don't have much scrap yet and my fimo scrap is so much softer than the kato I didn't think it would work very well. Nothing for it but to use good clay :( I figured it would be OK I could wash the playdough off after. Still didn't have quite enough of one colour so added a second layer of playdough too - risky!
 Here it is ready to start reduction

So I have never made a cane this big before, only made a non round cane once before and it's Kato and I started making it several days ago - I was worried!

I started of by giving it a whack, I needed to get the clay in the middle moving. After a bit of whacking I tried a bit of pinching and squeezing. This was no mean feat! Slowly but surely it started to shrink in diameter and grow in length.

Here is it part way through the reduction process

I kept on squeezing and pinching and pulling until the outer layer of yellow clay started to crack up and I was worried about ruining my good clay I was using to wrap with. The cane was about 2cm across at this stage and I wanted it down to 1cm (those cake fork handles I am covering are narrow). I thought I would unwrap it, soak the playdough off and then rewrap it and continue. Then the impatient me decided that the clay was moving and if I did that it would be all stiff again. By now it was long so it would be difficult to store and handle. I didn't want to cut it too much as I would get more waste at the ends every time I cut it before finishing reduction.  I carefully continued reducing without packing and managed to keep the shape fairly intact. I did have to slightly pinch the tip when I had finished but that was OK .

(Has anyone tried this technique with Kato clay? Do you get cracking? Is it my cane is too big? I will investigate with some smaller canes and will let you know how it is.)

This is the useable cane I ended up with (and also a pile of scrap from the ends)


I decided to keep some larger bits of cane in case I wanted to do something else with it . I have way more cane than I will need for the project. I had tried to estimate how much I would need to cover the handles but my calculations were somewhat off. I will go back and look at how I worked it out and see if I can be a bit more accurate next time.

 Finished canes (although they haven't been cleaned of playdough yet)

So I can see that I should off put some more larger bolder designs inside the paisley pattern. I wish I had put 2 or 3 flowers and leaves in and not bothered about the little swirly bits. I knew they would get lost in the reduction but I didn't think about the fact the background would look so purple.

Time to get on with covering these handles - I need them in the post by Monday!


Thursday, 4 March 2010

Paisley Cane Project

*** See all this content and new content on my current blog - www.carajane.co.uk/blog ***
This post can be found here http://carajane.co.uk/2010/03/paisley-cane-project.html


So for the first time ever I have sat down and properly planned a polymer clay project, normally I have a rough idea and just sit down with my clay or pick a tutorial to follow. I wanted to make a set of decorated handle cake forks for my sister in law. She is married to an Indian and has her dining room decorated in an Indian theme and she has recently returned from a holiday to India so I decided to make them based on an Indian theme.

I browsed some images on the internet and collected together some of my favourite and looked at the colours. I liked the bright colours and  settle on a palette to use in my project and even made a contrast table (as suggested in Color Inspiration).

Here are the colours I chose, all custom mixes (chosen from my colour tasting tiles held up against the images I printed) with the exception of the yellow which is straight from the packet. There is a recipe on the back for each colour. This is Kato clay by the way.


I then designed the clay 'fabric' I would make to cover the handles. I decided on a Paisley cane and even did a sketch. I tried to work out roughly how much I would need to make a cane the right size. It would be terrible to run out! I will also use the components from the paisley scattered amongst it, the leaf and the flower.

I started by making a flower cane, I backed it with purple as that will be the base colour of the fabric.


I then started using my drawing to  make the cane (I have always just made it up or followed a tutorial before)
I had meant to make the centre of the Paisley a different colour, possibly white. I meant to make the petal cane and then construct 2 different flowers with different backing  but I forgot and only made one flower cane and that was backed with purple - so purple it was... 

Packing in place for main part of cane. It is going to be reduced pretty small to fit on the fork handles so thought the black outline would help. Probably some of these shapes are too small.
   It was a close call with the orange. I ran out of red Kato so couldn't mix any more. Luckily  by using skinner blend logs I had enough. More red ordered and should be here by the weekend!
The cane ready for reduction. But how should I reduce it? I am off to experiment with the different techniques and will report back.